As you can read in my earlier posts I have become quite attached to the AVR microcontrollers from Atmel. We also use these microcontrollers in projects with our students at Uppsala University.
Probably one of the widest spread development tools for AVR controllers is the original STK500 starter kit from Atmel, which in principle supports the whole family of 8-bit controllers. The board is equipped with 8 push-buttons and 8 yellow LEDs for simple user interfaces. Since the STK500 supports target voltages for the inserted microcontroller from 1.8 V to 6 V the developers at Atmel came up with the following solution to “drive” the LEDs:
The figure below shows how the LED control is implemented. This solution will give the same amount of light from the LED for all target voltages from 1.8V to 6.0V.
source: http://support.atmel.no/
What has annoyed me from the very first day I have played around with my STK500 is the fact that the LEDs are “inverted”. An LED is on when the corresponding connector LEDn is at 0 V, corresponding to a logical “0” inside the controller. A dark LED symbolizes a logical “1”. OK, you can get used to it or you simply let your code put out the inverted number, e.g.
while (1)
{
PORTC = ~i;
i++;
}
But last week me and a colleague at UU were discussing the design of the Atmel LED interface in more detail – and we started to wonder. Looking at the circuit you can ask yourself what the meaning of this transistor in the middle is, since it is obviously not amplifying any current. When the connection LEDn is at 0 V the full LED current of about 18 mA plus the base current which is defined by the base resistor and the board’s target voltage Vtg goes out through LEDn, into the output pin of the attached microcontroller and is sunk to ground within the microcontroller.
So what is the meaning of this circuit then. It obviously does not help to keep the specifications of a typical AVR microcontroller which limits the current per output port (PORT A, B, C, D), e.g. in the case of the ATmega16:
The sum of all IOL, for ports A0 – A7, should not exceed 100 mA
As you can see, setting all 8 bits to “0” will sink a current of 8x 18 mA = 144 mA. Probably not a big deal – a lot of AVR projects out there skip all driver electronics when connecting LEDs to the ports and so far I have neither heard of, nor experienced any problems. However, if there should be a problem don’t go to Atmel and complain, because they have warned you! Yet they ignore their warnings in their own development board.
In the meantime I have of course figured out why they did not connect the LEDs directly to the LEDn connectors – have you?
If the target voltage is set to e.g. 1.8 V on the STK500, while the anode of the LEDs is connected through 150 Ω to the internal +5 V supply, then the LED will light up even when the output is set to “1”. The voltage drop of (5-1.8) V is still enough to let it shine – a bit dimmer, but the difference would probably be hardly noticeable. With Atmel’s transistor circuit however, the voltage at LEDn has to be at least 0.6 V below the current target voltage – even at a target voltage as low as 1.8 V low enough to ensure proper operation.
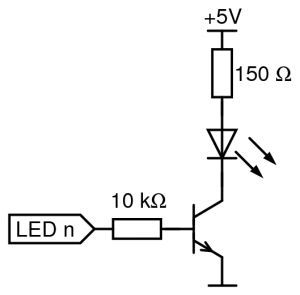
But – I would like to ask Atmel – what was wrong with the plain old logic-level driver, found already in textbooks and datasheet for digital electronics from the 1970’s?
Here the digital output connected to LEDn drives a base current as soon as it is above about 0.6 V. The component count and component values are exactly the same as in Atmel’s design. The only flaw I could think of is that this driver does not indicate open-collector or open-drain outputs correctly. This, however, could be achieved with an additional pull-up resistor, about 10 kΩ connected between LEDn and +5 V. An unconnected or disconnected LEDn would then show up as a lit LED – why not? An open input at the AVR is also generally recognized as a logic “1”…
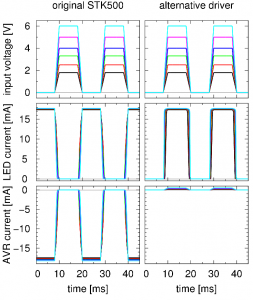
So, would this circuit behave correctly then? For all target voltages from 1.8 V to 6 V? Well, look at the LTspice simulations:

Results of the LTspice simulations of the original Atmel STK500 LED driver circuit (left) and the alternative base-driven LED driver (right).
The top graphs show the input signal at the LEDn connector, the middle graphs the current through the LEDs themselves. As you can see – except for the inversion of the output signal in the original case – the LEDs are driven with the same current of about 18 mA in the lit state in both circuits. The lower graphs show the current sunk into (negative current, left side) or draw from (positive current, right side) the corresponding I/O pin of the AVR. The original Atmel circuit has to sink 18 mA in order to light up an LED, while the alternative circuit has to deliver a maximum current of 0.5 mA (at a target voltage of 6 V).


You are absolutely right!! Totally agree!!